One of the first things you ever hear about when transitioning to the bagpipes is how we need to blow ‘steadily’ in order to produce a good sound. So, this particular focus will come as no surprise to anyone. However, there are some very important things to keep in mind about physical blowing technique. And, it’s important to practice these things (and prove to ourselves we can actually do them) in a controlled environment before we attempt to do them with the full instrument cranking away and the demands of bagpipe fingerwork distracting our minds.
When you can play your full instrument, you will actually be operating four instruments all at the same time – the chanter, and three individual drones.
In order to tune everything well together, and get them operating together as a single instrument, you need to master the art of supplying a perfectly ‘steady’ flow of air to your bag, so that the bag can supply each of the four reeds with a consistent flow of air.
This would be very easy, except that you can’t continuously blow air forever out of your lungs. Every few seconds, you’ll need a break. You know – to breathe and all. That’s where the controlled balance of squeezing the bag comes in to complement your breathing, as part of what I call ‘the blowing cycle’.
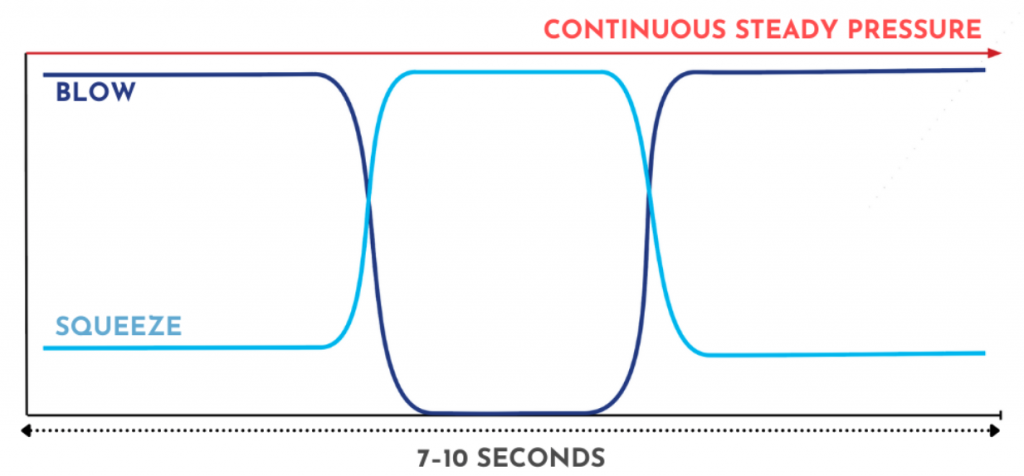
This graph displays the relationship between your blowing and squeezing arm. Together, these two partners need to produce a continuous, steady pressure out of our instrument, and the complete cycle should mirror a natural breathing cadence (roughly 60% blowing, and 40% squeezing).
There are four principles to steady blowing you should aim to master during this phase. They are of the utmost importance to producing a great sound, but we tend to forget them when we’re overwhelmed by other things like tuning and/or complex bagpipe fingerwork.
Principle 1: crossfading between blowing and squeezing
As you can see on our graph, we can’t simply ‘flip a switch’ between blowing and squeezing. Just like the clutch of a manual-shift car, a certain amount of cross-fade is necessary in order to get a smooth transition.
Eventually, you’ll need to ensure that your blowing cycle, seamlessly incorporating this cross-fading during every transition, is completely unconsciously competent – otherwise, you’ll have far too much to focus on when you try to incorporate the complexity of fingerwork while playing tunes.
Principle 2: Cadence
On the graph, you can see that the time elapsed for a complete blowing cycle is 7 to 10 seconds. This is because a healthy, sustainable blowing cadence should mirror a natural breathing cadence. As you’re reading this right now, how long does it take to complete a full inhale and exhale? However long it takes is how long a blowing cycle on your bagpipes should take.
Next, how long is your inhale compared to your exhale? Pretty evenly balanced right? Your bagpipe blowing cycle (blowing time vs. squeezing time) should exhibit the same balance.
If there’s just no way your blowing cycle can reach a smooth, comfortable, natural cadence, it means your pipes are not air-efficient. Or, once the chanter is integrated in phase 4, it could mean the reed you’ve selected is too hard.
Always remember, if your bagpipe isn’t comfortable to play, you’ll never attain control, enjoyment, or musical freedom with your instrument.
Principle 3: Squeezing arm always engaged
Look closely at the graph above. Can you see how the squeezing arm pressure never drops to ‘zero?’ Was this a drawing mistake?
Nope! While the blowing pressure obviously drops to zero when it’s time to inhale, the squeezing arm must never fully disengage from the bag.
The reason for this has to do with how our muscles work. When our brains tell our muscles to contract from a state of relaxation, it’s very difficult to ease into it. In other words, it’s hard for a muscle to contract from a relaxed state without it happening suddenly. Possible? Yes. But it is difficult and not practical during the operation of our pipes.
So, if you fully relax your squeezing arm during the blowing cycle, it’s going to be very hard to contract your muscles again without a sudden movement of the arm. And that sudden movement – you guessed it – causes a pressure spike that will, obviously, ruin your ‘perfectly steady blowing cycle’.
Meanwhile, if you can keep your arm at least slightly engaged at all times (I usually advise my students to keep the arm engaged at least 25%, even when blowing into the bag), it’s going to be much easier to graduate your squeezing back up to full pressure later on, executing that perfect ‘crossfade’ that we illustrated earlier.
This principle is very difficult for some to master. It also will cause some muscle soreness as you work your squeezing arm into shape. Many of us have been unknowingly doing this poorly for a long time, and so incorrect coordination is currently ingrained deeply.
Don’t waste a moment. Dig deep (even though this may at first glance ‘seem’ easy) and try to re-teach yourself perfect squeezing-arm mechanics.
Principle 4: Keep great posture
Maintaining great posture using the four non-negotiables will be vital for mastering steady blowing mechanics. Make sure you have all of those ducks in a row as part of your physical blowing mechanics training!
Now, prove you’re a steady blower – with a manometer
Now that you’ve set up your pipes, religiously maintained them each session, and mastered physical blowing mechanics and tuning, it’s time to introduce a merciless aid to your practice regime that will empirically improve the steadiness of your blowing cycle – the humble manometer.
A manometer can measure the pressure inside your bag continuously as you play. They come in two varieties – a tube water manometer, and a mechanical gauge manometer.
At the Dojo, we strongly advocate for using the tube manometer – in fact, we have instructions on how to build one on our site, and after a quick trip to the hardware store, they’re remarkably straightforward to assemble.
Why is this useful? Well, although you may think you have a great ear for how steadily you’re blowing, a manometer allows you to visually observe what’s happening. If you’re correct about your steadiness, the manometer will confirm it for you. But let’s just say… most of us are in for a rude awakening!
The Dojo is not the first to use a manometer. You’ll see pipers all over the world use them to help develop bagpipe tone. However, we use the manometer in a much more impactful way than any others I’ve seen, especially for maintaining blowing at the chanter reed’s sweet spot, which we’ll look at in the next chapter.
For now, though, the challenge is to be able to hook up the manometer to one of your drones (usually the middle tenor, with the drone reed removed), plug up your chanter (for now we’ll keep that earplug or golf tee plugging the reed-seat so we can focus on just one drone reed operating), and to practice the four principles of blowing mechanics to hold the water in the manometer tube within 1/2 inch of movement at around 12 inches above the water line, for around one minute.
Now, this may sound like it’s ‘elementary’ or ‘boring.’ But, remember that this isn’t just about being able to do it. It’s about being able to do it with unconscious competence, as an automatic reflex, so that we can focus on and master other things that need to be layered on top of this skill later on.
It’s also deceptively difficult. I’ve had students at the Dojo who were proficient players struggle to pass this phase for many weeks, much to their frustration. Developing the coordination necessary to do this effectively, and to the point that it feels automatic and natural, takes time – but will pay off ad infinitum in your future playing.
As you work on this, ask yourself if the four main considerations we discussed earlier are still true:
- Am I crossfading effectively during my transitions?
- Is my full blowing cycle natural (7–10 seconds long)?
- Is my left arm staying engaged for the entire blowing cycle?
- Am I maintaining excellent posture? In particular, keep an eye that your squeezing arm stays unimpinged and that your wrist always maintains a neutral angle.
As you become more confident with this, you can try a few things to develop your skill further:
- Add in the (silent) fingerings of simple tunes to the mix. Is the water still steady?
- Add marching in place once you’ve maintained steadiness while fingering tunes. Still steady?
Lastly, a great exercise is to record yourself to see if you can maintain steady pressure without looking at the manometer. Simply turn around, press the red button on your smartphone, and record. Don’t quit until you can do this well!
0 comments